Thursday, December 9, 2010

DIY Christmas Wall Art

It's that time of year again. The time for fluffy white snowflakes, caroling in the crisp wintry air, mugs of hot chocolate to warm your hands. The time for giving, hoping, celebrating. Christmas is such a joyous holiday. There is something about this time of year that gets me all giddy. Maybe a leftover twinkle of magic I used to feel at Christmas when I was a kid.

Well, it's also time to hurry and finish your last minute holiday home sprucing. If you're like me, you have lots of wall space just waiting for something pretty to warm your room. I like to switch out my wall decor to coordinate with my other seasonal decorations. Remember this painting we did last month? It was a fantastic addition to my wall, that gave the dining room a nice warm feeling of autumn.

Now that we have several inches of snow on the ground, and we've pulled out the Christmas lights, my painting is starting to feel a little out of place. Time for a change


My solution was oh, so simple. Pretty, festive, and not overdone. 

Want to make your own?
Here is what you will need:

1/2 yard of festive holiday fabric. You can mix and match prints if you like.

1 large piece of foam board

Raffia, ribbon, or string

Glue gun and glue sticks

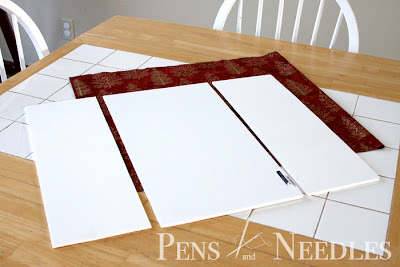
Start by cutting your foam board in the shapes and sizes you want your wall art to be. I chose to make mine out of three rectangles, all the same height, with the middle being wider than the end pieces.


Next, cut your fabric about 1/2 to 1 inch larger than the corresponding foam board piece.


With a hot glue gun, glue the fabric tight to each board. Be sure to pull the fabric tight around the edges as you glue, so each piece lays flat against the board.


Take your raffia, ribbon, or string, and cut a piece (or several pieces) long enough to hang your boards at the length you want. Then cut that piece (or pieces) in half, so you have two sides to tie together.

Glue each piece to the back of your board, about an inch or so away from the outside edges.


Then, tie your bow and hang your board. 


Now repeat the previous steps for your remaining boards. 

I chose to hang mine at different lengths, with the bows being at equal height on the wall, and the boards each hanging higher than the one before it.


It's a fantastic, easy solution to add some festive flare to my boring, drab wall. 

I utilized some candleholders and votives I had leftover from my wedding to dress up the table. A little red accent goes a long way.


Elegant. Simple. Beautiful.


Sit back, relax, and take in the holiday season.


Now go make something, and enjoy the day!


Please be sure to check out my Facebook Page!


Thursday, November 18, 2010

Easy Reversible Placemats

Well, Thanksgiving is almost here. Are you ready? Most of you are probably way ahead of me. Luckily (and also unfortunately) we won't be hosting a big Thanksgiving dinner at our house year. But I still wanted to put some things together for years to come, and to maybe help you along with your last minute details.

So here we are. A table setting, fit for a feast...a small one at least. My table only seats four people. Hopefully, yours is a little bigger to accommodate all of your guests.


And what good is a Thanksgiving feast without a little color? Looking for an easy fix to spruce up your bland white table linens? Try these super easy reversible placemats. All you need to know is how to sew a straight line. Easy as pie.


You will need:

Two coordinating cotton prints

Sewing machine

Thread

Scissors

Pins

To make one placemat, you will need two pieces of fabric. I made 4 placemats, so I started with 8 rectangles; 4 of each print. Each rectangle is 13x19 inches.


Pin front and back pieces of the placemat right sides together. 


Sew around the entire edge of the placemat with a 1/4 inch seam allowance, BUT leave about a 4 inch opening on one side.


Snip each corner. This helps to reduce bulk in the corners when you turn it right side out.


Using the opening, turn the placemat right side out.


Using a pointy object, something like this (or a pen will work too)...poke out all the corners to a point.


Iron the entire placemat flat.
 Tuck in the opening edges and press. 


Pin in place. Topstitch close to the edge around the entire place mat, sewing the opening closed.


Ta da! What did I tell you? Piece of cake! Or pie...


Now you have a double-sided placemat for more than one occasion! Now put it to the test. Add some flowers, candles, pumpkins, whatever you see fit. And look how great your wall art from this post compliments your table!


Happy Thanksgiving!


Now go make something, and enjoy the day!


Thursday, November 11, 2010

DIY Autumn Wall Art

I may be a little late in the game, but I finally decided to do something about the lack of autumn decor in our house. It's not too late though! Thanksgiving is just around the corner, and I need some pretty things to jazz up my boring walls and to help give my house a little holiday face-lift.

So, yesterday I woke up and decided to paint. I haven't painted in ages, but I always keep my old art supplies around. I went digging through my closet and came up with the essentials to make a colorful painting for my bare dining room wall. 


Now, before you run away from the word "painting", take a closer look at the simple elements that make up this piece. We are entering the realm of abstract art, where there really are no rules, no standard technique. What happens on the canvas is between you, your creative mind, and your paintbrushes. The possibilities are limitless.

Even as I take you step by step through this one, I think you'll find that art is not as foreign or difficult as you might think.

Have I convinced you yet? Want to try it out? OK, if you're still with me, here are some things you'll need:

1 Canvas - any size you want

Acrylic paints

Various brushes

Cup of water to rinse brushes

Leaf stamps

I have a beginner's acrylics kit that would be perfect for occasional uses, or to get you started in your own painting endeavors. It includes several different brushes, a palette, palette knife, paints of many colors, and even an artist smock. 


Make sure your work area is clean and well prepared for paint spills. Since I don't have an easel, I covered my kitchen table with paper grocery bags. 

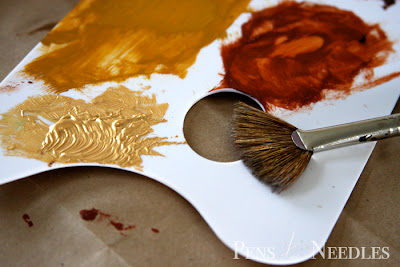
To get this painting started, I knew I wanted to use classic autumn hues: mostly oranges, browns, and yellows. Starting with the background colors, I used a sponge brush to cover more surface area and to help blend the colors together better.


Start by brushing on a dark brown from the bottom to about 1/3 of the way up the canvas. Be sure to paint the edges of the canvas as well, since this painting will not be framed. Next, add a second color (I used orange) to cover another 1/3 of the canvas. Try to blend the two colors together where they meet. The best way to blend is by using long and whispy brushstrokes in a back-and-forth motion to pull each color into the other.


Don't worry about perfection. Painting is all about layering. The top layers will hide any imperfections in the bottom layers, and paintings are not always about being perfect. If you have more texture, you will have more depth in the end.

For the top 1/3 of the canvas, I brushed on a yellow. I then went back over the other colors with that same yellow, blending all the colors together and creating a sort of sunset backdrop.


Next, take a fan brush. A fan brush looks just like a fan: round and flared at the top. Use a metallic gold or copper paint.


Starting from the bottom, dab the paint up the canvas and into the corners.
Dab dab dab. That's as technical as it gets. Keep dabbing...


There is no right or wrong here. Go wherever you see fit. Up the sides, down the middle, don't worry about it. Just have fun dabbing away.
Go back in with a different color, and define a couple different areas. I took brown and dabbed in the middle. Then I took a little green and yellow, and went back over it again.


Still dabbing? Good. Keep going.

Continue dabbing away until you come to a good stopping point.You can cover the whole canvas if you want. It's completely up to you. Once you're done, step back and take a look at what you have so far. If you see something you don't like, you can go back in and fix it. Now is the time to do it. Remember, paint goes over paint. If you make a mistake, you can cover it up.

All done? Alright, let's finish it up.

Find your leaf stamps. You can have more than one, or just one that you prefer. I chose this one. You can find plenty of stamping materials at your local craft store. Look in the sale bins. You never know what you'll find.


Using the same basic paint colors as before, brush a little paint on the stamp. Don't worry, these wash off easily and acrylics are water-based, meaning easy clean-up when you're done.

Start stamping away.


Switch up your colors, and keep on stamping.


Stamp until your crafty heart's content.

Now take a step back and look at your creation.


Satisfied? I know I am. Now hang it on the wall so you can admire your work.


Congratulations, you are an artist!

What does yours look like? I think mine looks like a forest of trees with leaves caught in the wind. Others may see something different. But that's what's so great about an abstract piece. The art is in the eye of the beholder. Everyone sees something different.


Thanks for braving a painting with me! I hope you enjoy it, and have fun showing off your artwork to friends and family.


Now go make something, and enjoy the day!